Perkin-Elmer 460 AA Operation
Before you begin, make sure that you have prepared the standard solutions for the element to be tested.
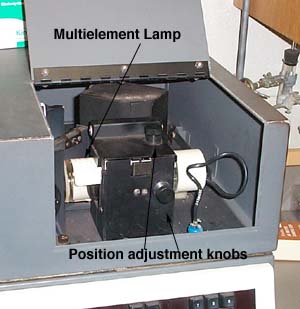
In the current configuration, the 460 is set up for an acetylene/air combustion mixture (make sure it is air, not oxygen) and has a multiple element lamp (Al, Ca, Cu, Fe, Mg, Si,and Zn). All of these elements are active simultaneously and you can analyze for them by changing the wavelength the detector reads.
Below is a picture of the AA.
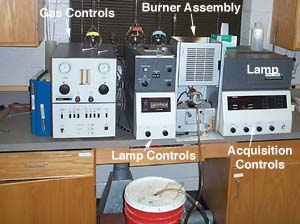
Turn the Signal control knob to LAMP (bottom left knob in acquisition controls). Turn the Lamp knob (in Lamp Controls) all the way counterclockwise. Turn on the Power (bottom rightmost button). Turn the Lamp knob slowly clockwise until the Energy/Lamp needle reads 30. This corresponds to 30 milliamps which is the current specified by the lamp currently installed. The lamp is now on.
Turn the Signal knob to SET UP. Set the slit width to 0.7 nm (may need to be set to a different value). This knob is above the Energy/Lamp meter. It sets the width of the monochrometer entrance slit.
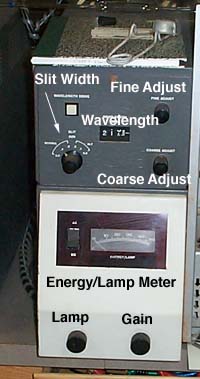
Tune the wavelength. Trun the COARSE ADJUST knob until the WAVELENGTH readout is roughly that corresponding to the element of interest (Zn is 213.9 nm, Ca is 422.7nm). Now use the FINE ADJUST dial to maximize the signal on the Energy/Lamp dial (the dial now corresponds to the amount of light falling on the detector). You may have to adjust the GAIN dial to get a reading on scale.
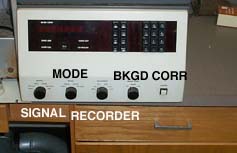
Set the SIGNAL knob to ABS, the MODE knob to CONT, and the BKGD CORR knob to AA.
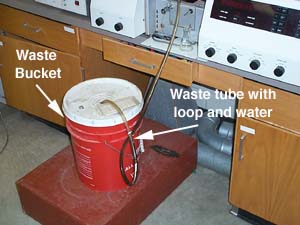
Make sure that the drain tube is properly looped (shown below) and there is water in the loop forming a trap.
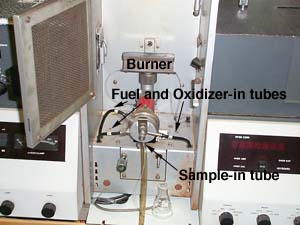
Turn on the power switch for the gas control module (lower left switch). The GASES ON/OFF switch should be off (no light). The BURNER HEAD indicator light should be green.
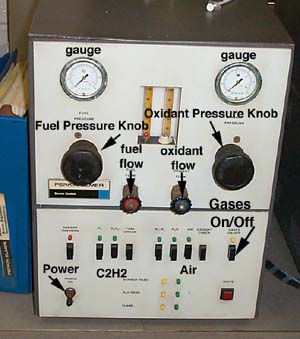
Make sure all gas hoses are attached from the acetylene and air cylinders. Open the valves on the air and acetylene tanks. Set the low pressure gauge of the acetylene regulator to 12 psi. If the high pressure gauge reads 75 psi or less, change the acetylene tank.
Set the low pressure gauge of the air regulator to between 60 and 80 psi.
Make sure the C2H2 button is pressed and hold down the FUEL CHECK button. While holding down the FUEL CHECK button, use the FUEL PRESSURE knob to adjust the FUEL PRESSURE gauge to 8 psi. Use the FUEL FLOW knob to adjust the flow to a reading of 32. Release the FUEL CHECK button. Gas will flow for several seconds after you release the button.
Make sure the AIR button is pressed. Press and hold down the OXIDANT CHECK button. Use the OXIDANT PRESSURE knob to adjust the gauge to 30 psi. Use the OXIDANT FLOW valve to set the flow rate at a reading of 55 on the ball gauge. Release the OXIDANT CHECK button.
Push in the GASES ON/OFF button. Push the INGNITE button. If the flame will not light, use the grill lighter by the AA. The FLAME indicator light should now be green.
Select an integration time on the numerical keypad (between 0.2and 60 s) and pressthe INT key to set your integration time.
Aspirate a blank solution into the burner an press the AZ key to subtract the background.
Aspirate your standard solutions into the burner. Record the absorbance readings after they stabilize.
Aspirate the blank in between the standards and in between the standards and the unknown sample. Aspirate the unknown sample and record the absorbance reading.
Aspirate water into the burner for 10 minutes. Press the GASES ON/OFF button to turn off the gas flow. The burner flame should go out. Close the acetylene cylinder valve. Press the FUEL CHECK button until all the acetylene has been bled from the lines. Turn off the air tank at the cylinder.
Turn the SIGNAL knob to LAMP and turn the LAMP knob until the ENERGY LAMP scale reads 0. Turn off the power to both the gas controller and the AA.
This tutorial was created by Michael R. Jordan at Oklahoma Baptist University. Reproduction by printing or photocopying for instructional use by educational institutions is allowed.