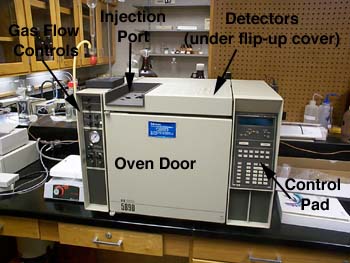
Operating the HP 5890A Gas Chromatograph
Before you begin, you will need to know that you will be utilizing the TCD detector (this machine has both a TCD and a flame ionization detector). To prevent damage to the TCD, you must have He flowing through the machine before you turn it on.

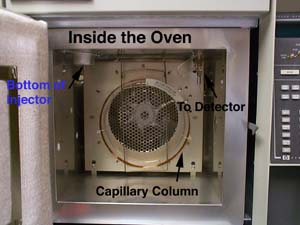
This GC currently has a carbowax 0.32mm x 25 m column installed. It also has a split injection system. When you inject a sample, it is vaporized, but only a portion of the injected product is directed into the column, the rest is expelled. This allows conventional injection amounts without overloading the small-diameter column.
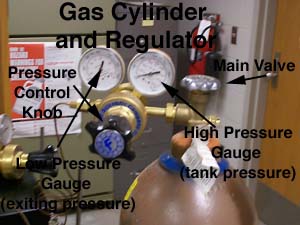
The first step is to turn on the He at the tank using the large knob directly attached to the tank. Open it all the way. The high pressure gauge of the regulator should read at least 500 psi. If it doesn't, notify your instructor. The low pressure gauge should read about 40 psi. If it doesn't, adjust it using the valve on the regulator (clockwise increases the pressure).
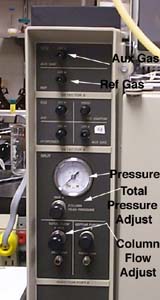
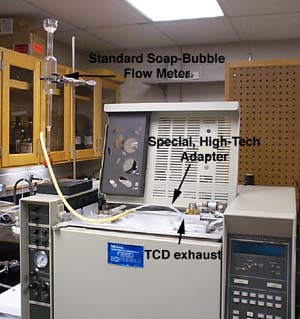
Now look at the far left side of the GC. You will notice that the TCD detector is detector A (you will need to know this when setting the detector temperature settings). You will also notice many valves and a pressure gauge. The pressure gauge here should be set to ~60 kPa (NOT PSI!!). If not, adjust it using the valve marked PRESSURE REGULATOR.
It is now time to check that there is gas flow through the system. Connect the soap-bubble flow meter to the instrument and verify that there is gas exiting the column. It may be very slow, but if gas is turn flowing you can turn on the machine. Before you turn on the machine, make sure that the integrator is turned on.
Set the oven temperature to 45, the initial temperature to 45, the final temperature to 45, the injector temperature to 100, and the detector temperature to 100 (degrees Celcius). When they have all reached the set temperature, check the flow rate. First, make sure that the reference gas valve and the auxilliary gas valve are both closed. The flow rate should be about 1 mL/min. Adjust if necessary with the TOTAL FLOW knob. Not open the AUX gas valve. Open it all the way (this valve is an ON/OFF valve). The total flow should now be about 5 mL/min. If not adjust by turning the screw in the center of the knob. Turn on the REF gas. The total flow should now be about 20 mL/min. Adjust as you did the AUX valve if necessary.
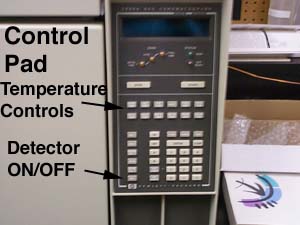
Now turn the detector on using the DET button on the bottom left of the keypad. Hit the DET button followed by ON. Also make sure that the integrator is turned on and has passed its self-test.
You need to wait for 20-25 minutes for the detector to stabilize. Then you are ready to inject a sample. Use a 1-1.5 microliter injection.
After placing the needle through the injector septum, you should press the start button and quickly inject the sample. The chart recorder on the integrator should start automatically.
When all of your peaks have eluted, press the stop button on the control pad. Make sure that all of the components have eluted before you begin another run.
Shutdown
To turn the machine off, first turn the DETECTOR OFF using the DET button. Set all temperatures to 0, don't just turn them off. Let the instrument cool with He flow for 20 minutes. Turn the oven, injector, and detector heating zones to OFF. Turn off the GC and the integrator.
This tutorial was created by Michael R. Jordan at Oklahoma Baptist University. Reproduction by printing or photocopying for instructional use by educational institutions is allowed.